×
One of our first concerns while building our new nursery was to introduce a drip raised bed gardening watering system for all the raised nursery beds. With regards to keeping plants solid and blissful, giving profound, even ordinary water is similarly essentially as significant as great soil, manure, and daylight!
However, drip irrigation for raised beds in gardening frequently goes ignored. Hand-watering is tedious, and it's challenging to be steady. Additionally, setting up computerized trickle water system frameworks can frequently feel threatening, as of not long ago!
Track and figure out how to set up a trickle water system for various raised garden beds. Our new drip irrigation for raised beds gardening framework uses trickle tape.
Yet the abilities you'll master today can undoubtedly be applied to different sorts of dribble producers as well. This article and the accompanying video will walk you through all that you want to be aware of, from provisions to the bit-by-bit process, so you can feel sure to set up a comparative trickle arrangement of your own.
Did you have at least some idea that automatic drip irrigation system frameworks save you investment while also saving water? Concentrates on demonstrating the way that dribble water systems can set aside 70% more water than sprinkler frameworks.
Instead of showering everything down haphazardly, the dribble water system conveys designated water right at the foundation of plants and soil. This diminishes waste, overflow, and dissipation.

Also, a trickle water system is more proficient and viable at watering plants profoundly, instead of just wetting the best of the dirt. Profound water implies further roots and stronger, dry-season, open-minded, and hearty plants. With everything taken into account, the trickle water system is a shared benefit—as far as you might be concerned—for your wallet, plants, and the planet.
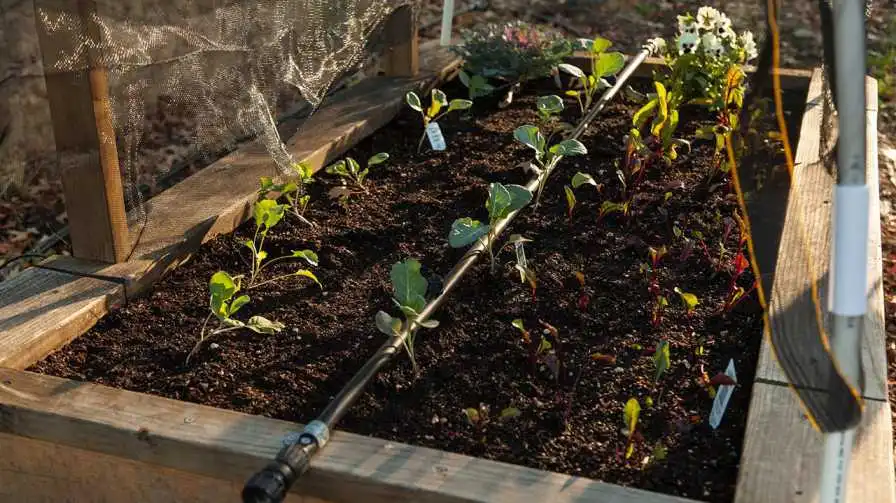
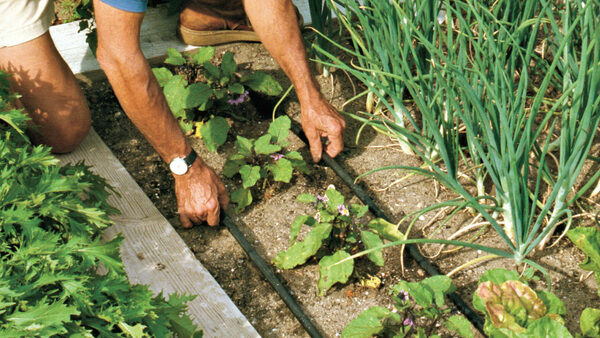
Trickle tape is basically a leveled variant of dribble tubing. It lays level on the dirt surface, but it puffs up whenever it's compressed and brimming with water. Trickle tape accompanies dribble producers pre-introduced at a set dividing, like each 6, 9, 12, 18, or 24 inches separated. Are you looking for the best raised bed gardening watering system?
Every individual producer will transmit a set amount of water, from 0.25 gallons per hour (GPH) up to 1 GPH, depending on the kind of dribble tape you pick. Dribble tape works at a lower water pressure (8–15 psi) than the standard trickle water system (20–40 psi).
It's vital to take note that not everything dribble tape is made equivalent. As a matter of fact, trickle tape frequently gets negative criticism as being brief or even "dispensable" in view of the way it's usually utilized in large ag.
However, the life expectancy of dribble tape depends on the quality and thickness of the tape utilized. We picked the thickest business-quality dribble tape we could find (15 mil), appraised to endure as long as 10 years when dealt with!
We decided to utilize trickle tape in our raised bed dribble water system framework for various reasons:
1: I love the comfort of pre-introduced producers, as opposed to poking holes and adding producers to strong ½" water system tubing as we've done before. || 2: I additionally like the nearby producer separating that trickle tape offers.
Our trickle tape has producers every 6 inches. There is one more style of round dribble tubing with pre-introduced producers (like this one). In any case, from what I saw, 9 inches was the nearest producer dividing accessible in that sort. We'll discuss separating beneath.
Trickle tape has the distinction of being less inclined to obstruct than different sorts of producer tubing. Trickle tape is all around planned not to obstruct, in any event, when covered underneath soil or mulch! It was energetically suggested by a companion of mine who does proficient nursery establishment and upkeep.
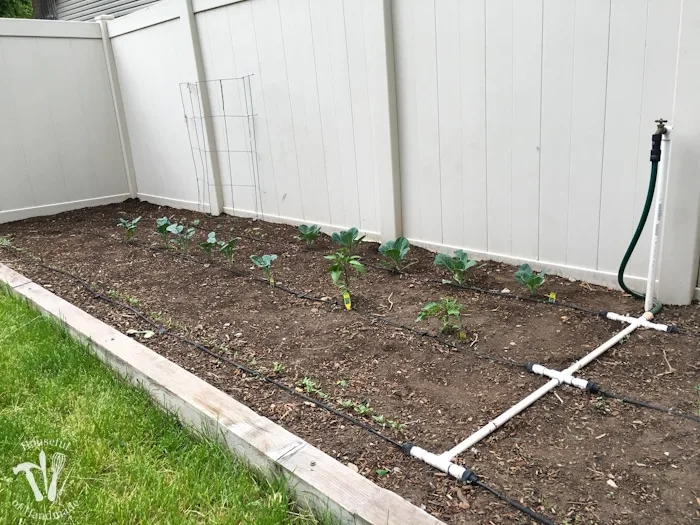
I suggest spacing drip irrigation in raised garden beds in a way that uniformly soaks the entire bed, with the lines no more extensive than 12" separated. All things considered, one of the many advantages of filling raised beds is that you don't need to follow unbending line planting, which is dissimilar to conventional field column crops.
Also, the more clammy soil there is near, the more worms, nematodes, and gainful microorganisms will flourish! To wrap things up, watering in a wide area around plants (rather than straightforwardly at their base) urges roots to investigate, becoming bigger and more extensive. That prompts greater, better plants!

In our 4×8' raised garden beds, we introduced the dribble lines around 9 inches apart, separated uniformly across the bed or four lines complete per bed. Each line of dribble tape has.25 gph producers per 6 inches.
This dispersal will give a pleasant, even circulation of water across the whole bed, permitting us to establish along the trickle lines in the middle between. It will be particularly perfect for intently divided plantings like root veggies.
It's ideal to situate the header in one short finish of your raised nursery bed. Then connect the dribble tape (or other trickle tubing and producers) starting from the header along the length of the nursery bed.
It depends! Each nursery will have different water requests in view of the novel environment, season, temperatures and precipitation designs. It additionally relies upon your mulching practices, and how parched your plants are.
Bigger, mature plants for the most part "drink" more water than more modest ones. Soil safeguarded with a decent 2 to 4″ layer of mulch will remain soggy significantly longer than exposed soil, incredibly lessening water needs.
As a general rule, it best to give less regular, profound, long watering rather than short shallow episodes of water consistently. This will support profound sound roots and more grounded, stronger plants.
Attempt to water to the point of keeping the dirt uniformly damp consistently, however permit it to dry out somewhat between watering. Obviously, you never maintain that the dirt should be absolutely dry! In any case, recall that plants inhale through their foundations - so the dirt ought not be continually sopping wet by the same token.
In our environment, we normally run our raised bed dribble water system framework for about an hour two times every week. The time you run your framework will likewise fluctuate contingent upon the kind of producers utilized. For example, assuming we were utilizing dribble tape with .5 gph producers (rather than .25 gph), we could run the framework for around 50% of how much time.
While direct-planting seeds, plan to give extra above or hand-watering during the initial not many weeks. That will assist with keeping the highest point of the dirt overall quite moist during germination and early root advancement.
Similarly, as with a wide range of water systems, it's ideal to winterize your raised bed trickle water system framework prior to freezing conditions emerging.
At least, completely channel the framework and safeguard it with a pleasant, profound layer of mulch. Leaving standing water in lines or valves can make them break when the water freezes and extends.
Or, on the other hand, to additionally decrease the risk of harm, people in very cool environments might need to eliminate the trickle water system parts totally, putting them away in a safeguarded area over winter.
There is compelling reason to dismantle the entire framework, be that as it may! Utilize a strung connector at the mark of association in each raised bed. Then, at that point, you can basically unscrew it, eliminate the whole header and appended dribble lines together in one piece, and drape it in the carport (or something almost identical).
Normal family water pressure is around 40 to 60 pounds per square inch, otherwise called PSI. That is an ideal strain for sinks, showers, and open-air hose face cloths.
However, dribble water system frameworks can't deal with such high water pressure. A lot of strain can cause "victories" or harm. Thusly, you'll probably have to add a strain minimizer to your raised bed gardening watering system framework.
The best working tension for standard drip irrigation tubing and producers is between 20 and 40 psi. Most times, one strain minimizer toward the beginning of the framework is satisfactory (for example, where it interfaces with a fixture or control valve).
Our principal water system valves previously had 40 psi pressure minimizers introduced at the head get-together. Note that lengths of more than 100 feet of standard ½" water system tubing might begin to lose strain at the farthest end.
However, dribble tape needs even lower pressure, from 8 to 15 psi, contingent upon the thickness and details of the picked trickle tape. To keep up with the great water tension all through our huge nursery space, we kept our principal PVC lines at 40 psi; however, at that point, we added a 15 psi pressure controller inside each raised bed prior to interfacing dribble tape.
The following is a rundown of the provisions expected to make a dribble water system framework for raised garden beds using trickle tape. Toward the end, I likewise noticed a couple of elective supplies and changes in the event that you like to utilize standard ½" dribble tubing rather than trickle tape.
1: A fundamental water supply. We ran PVC to each raised bed and then switched over completely to dribble tubing inside each bed. Notwithstanding, you can without much of a stretch run a similar kind of trickle tape water system framework from a normal fixture or hose face cloth. This article and video will tell you the best way to join a trickle to a hose napkin with a robotized clock.
2: Standard ½" water system tubing, which you can purchase here in 50 to 1,000-foot rolls. This will be utilized to make the fundamental "header" that the dribble tape lines will join.
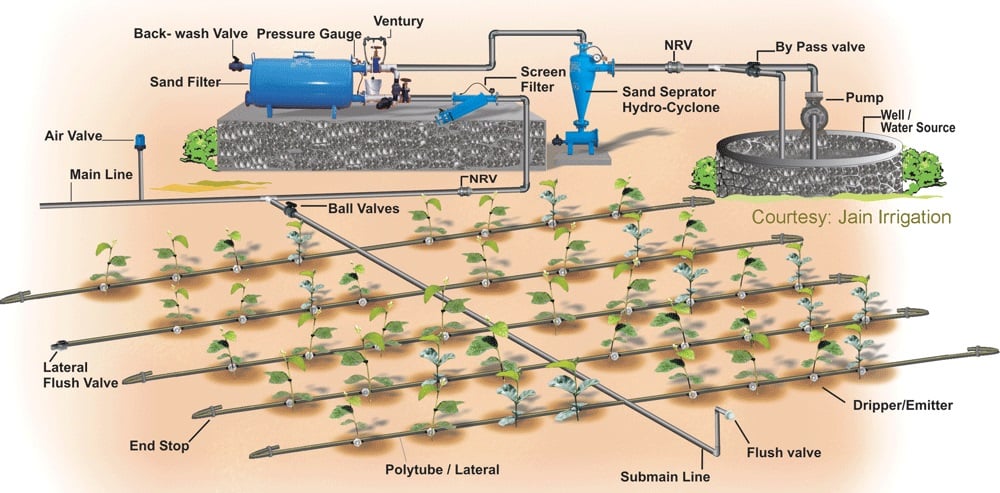
A connector to associate the ½" dribble tubing to your principal water supply. We utilized this connector to change over from strung ¾" PVC line to ½" water system tubing (which has a possibility for ½" strung pipe size under a similar connection). Then again, this 4-in-1 connector is ideal to join trickle to a standard fixture or hose chin-wiper, all things being equal. It incorporates a strain minimizer, a discharge gadget, a channel, and a dribble tubing connector.
3: discretionary, however suggested: a valve to exclusively control or mood killer each raised bed. Our PVC-to-dribble connector (portrayed simply above) has a valve previously included. Notwithstanding, you can purchase these different valves to introduce inside your ½" tubing as well.
4: Tension minimizers. Standard dribble frameworks ought to be decreased between 20 and 40 psi, which can happen at the principal association (for example, at a hose bibb or water system valve). Our primary water system valves previously had 40-psi pressure minimizers introduced.
Frameworks utilizing dribble tape should be additionally decreased to 8 to 15 psi (check your trickle tape details), so we added 15 extra psi pressure controllers at each bed. Note that our controller is made to associate with ¾" pipe string; however, different sizes are accessible.
5: Elbows as well as tee connectors to make the header. We lean toward these Perma-loc connectors that screw on over the tubing. They can undoubtedly be detached on a case-by-case basis for fixes or changes. Rather, these normal pressure-style connectors are more long-lasting; things should be sliced apart to make changes.
6: Dribble tape of the decision. We utilized this uncompromising 15-mil trickle tape with 0.25 gph producers at 6 inches. The 0.5 gph would be great for raised beds as well! Dribble tape comes in rolls of 100, 500, 1000 feet, or more. Run some speedy math to decide the amount you really want. For instance, we introduced four 8-foot lines per 4×8' bed. So that is 32 feet for each bed x 16 beds (in addition to a couple of more modest beds) = around 600 feet. See above for more data on dispersing.
7: Spiked connectors. We utilized these 3.6 mm spike connectors to interface the ⅝" trickle tape to the ½" header tubing. End covers or clips. We use figure 8 clips to end the ½" water system tubing header. These conclusion cuts are what we used to end each line of dribble tape.
8: A punch instrument. Used to add openings to the ½" water system tubing and afterward interface different connectors or trickle producers to it. Here is a straightforward hand punch, or this choice is like what we use.
9: Stakes, sticks, or excited scene staples to hold everything set up. In the event that you're working with PVC, you'll require PVC groundwork, sticks, and a decent arrangement of fastener-style pipe cutters.
10: Discretionary: a clock or regulator to mechanize the framework. Our plantation, existing nursery, and new raised bed trickle water system frameworks are associated with a sun-fueled Tracker 6-station regulator. The other dribble frameworks we run from hose face cloths have this basic fixture clock.
A reverse preventer and channel. It's best practice to have a reverse counteraction gadget to prevent soil or other foreign substances from getting into your family's water supply. Essentially, a channel will keep trash from entering and stop up your dribble water system framework.
There are a couple of reverse preventer choices, contingent upon your principal water supply association. Hard-channeled frameworks like our own normally have a channel and reverse preventer inside the mainline head get together.
On the other hand, in the event that you are interfacing with a hose chin-wiper, utilize a 4-in-1 fixture connector, which has a reverse gadget, channel, pressure minimizer, and trickle connection. You can add a clock as well! See photographs of both underneath.
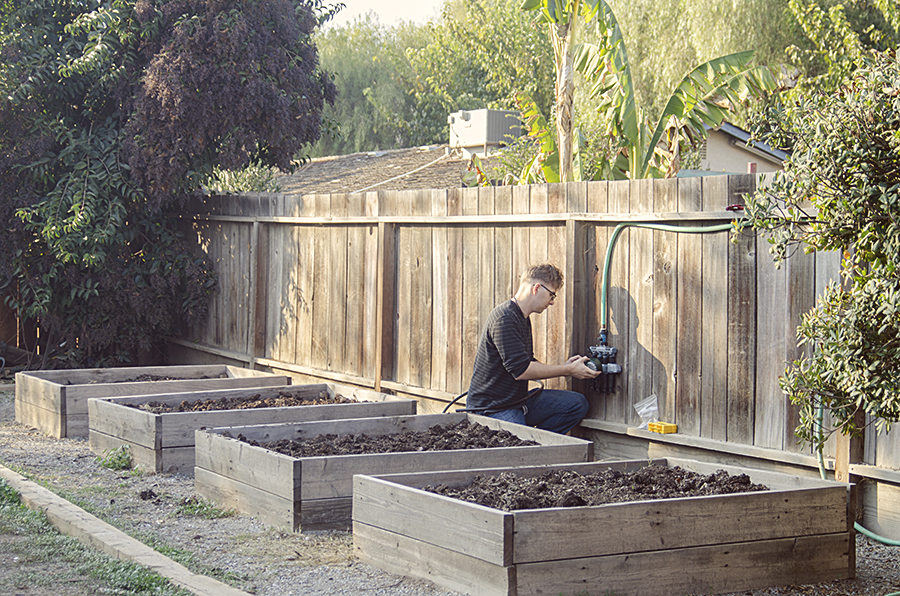
Presently, kindly partake in this video exhibit that will walk you through the establishment cycle. Then, at that point, continue to look for a composed rundown and extra photographs of our framework.
Prior to getting everything rolling and making your own raised bed gardening watering system framework, draw everything out! That will assist you with envisioning the framework as well as foster a rundown of the parts you really want.
.